
NOTE: Throughout the history of mankind, people engaging in any type of farm work have done so at their own risk. The following video and article depicts elements of danger that are quite obvious to all viewers blessed with common sense, and is not intended to be used as instruction in safety procedures … especially not for folks with limited or no experience with dangerous tools. There are also many factors that determine the integrity of a large structure like the one being built here. Anyone attempting to build their own structure themselves is really doing this: exercising the liberties and freedoms this country has always recognized for folks to do things for themselves … at their own considered risk.
I really hope you enjoy readin’ and viewin’.
Pa Mac
No roof, nor floor, but ne’r a fuss,
A quick floor comes down after
we work and build and set a truss,
and then we’ll nail a rafter
by F. Lore Tacker
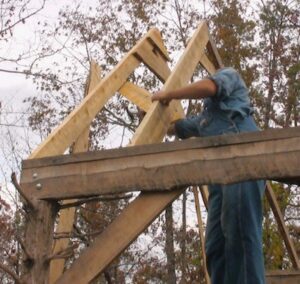
At this point in the construction of my pole barn workshop it’s time to work on the roof that will one day be sheddin’ rain off my tools. The topmost part of the roof will consist of individual sections or “trusses”. Each truss will be built one at a time up in the loft area, rather than buildin’ ‘em down on the ground and hoisting ‘em up again. Since these trusses don’t weigh a great deal, it’s not too difficult for one person (your truly) to maneuver them in place when it comes time to put ‘em up. This is another classic example of eating the elephant one bite at a time. And I’m hungry.

But there’s one small problem: I don’t have a floor up in the loft to stand on while I’m makin’ trusses. Oh well, I’ll make a quick one out of the boards I’ll use later for rafters. They’re 1 and 3/4 inches wide and they’ll work great if tacked down temporarily.
A master truss is built first according to my specific dimensions. The two long boards for each truss are exactly 8 feet long, and when put together will span 11 feet 2 inches at the bottom, which is the length between the two outer sides of the top sills. [I made sure the width from sill to sill was consistent back when I connected all the posts at earlier stages of construction. See Building an Old-fashioned Pole Barn, Part 2] Each individual truss is braced up high and cut to sit flush on the top sills.


Once I’m satisfied with how the master truss fits the top sills, I lay it down on the temporary floor and tack down some scrap wood around it to form a jig. Eight-foot boards that are precut to match the master truss boards are placed in the jig. This is why it’s good to have the temporary floor tacked down and not just sittin’ there. I don’t won’t those boards to move around on me or my jig will be off a jangle.


Then the cross brace is nailed on, with one nail at the top to help give it a tad more stability. As long as I go by the jig the last truss should fit as good as the first one. That’s quite theoretical, you know.
Now it’s time to install the trusses. Yeah boy.
These scrap slabs I’ve tacked up will keep the first truss on the end from fallin’ while I nail it in place. By the way, the first and last truss on both ends of the workshop will be situated with the brace facin’ in toward the middle. That’ll make sure they won’t be in the way when I go to nail the outer wallboards up later. It won’t matter which way the middle ones face, but if you don’t run ‘em all one way perfectionists who might one day happen to see it while millin’ about in your loft won’t be able to sleep at night, and other people will just wonder about you.

Pilot holes predrilled in the ends of the trusses are a big help, especially when you’re one person holding up heavy boards and nailin’ ‘em all while the wind’s blowin’. I also had the forethought to mark off the spacing (2-foot) for each of the inner trusses on the top sills with a pencil before beginning the installation. Sometimes thinkin’ really pays off.
Once the 2nd truss is partially nailed to the bottom sill, scrap boards are also nailed or screwed up diagonally on the inner sides of consecutive trusses—one on one side and one on the other crossing opposite to the first. Tacking or screwing these scrap boards in makes for easy later adjustment of the spacing between the tops of the trusses later if I need to … and I no doubt will need to. For now I’m not concerning myself with the spacing at the top; I’m just concerned with nailing both bottoms of each truss on my marks.

With the bracing on to hold the truss tops in place I can finish nailing ’em at the bottom. In addition to nailing a nail from the outside slanted edge, I also toe nail one in from the side. Once the bottoms are nailed securely, I make sure both end trusses are plumb. Then I see to it that from the tip top of one end truss to the tip top of the other end truss they measure the same distance as they do from the bottom of one end truss to the bottom of the other. Now, starting at one end, I can go back and readjust all the diagonal braces so that each truss is plumb (again, this is theoretical; for me, fudging is lifestyle).

These horizontal boards called lathing are what the tin roofing will be attached to. The lathing is spaced about 2 feet apart for a tin roof, and’ll make a good ladder to climb on when puttin’ the tin up. And it’s kind of fun to climb on, too. [You begin to forget that, though, when you climb to the top and realize you forgot to put nails in your pouch.] I stagger the seams of the lathing so that none of the splices are next to each other on the same truss. This gives a little more integrity to the roof. I let the ends run a little long out over the edge since I’ll stretch a string and trim ’em up even later. I give the lathing a couple nails at each intersection of a truss, and at the spliced joints, drive two angled nails on the end of each board. Although I used pine, sweet gum or sycamore would have been a better choice since they are not prone to splitting when nails are driven in close to the end of a board as is necessary when nailing lathing. Again, some fudging is in order: I nail as far away from the edge as possible, angling it in toward the truss below.
The side-shed rafters are the next to go up, so there goes my temporary loft floor. Each rafter will be notched to fit both the top plate and the side shed sill, and just like with the master truss, a master rafter is cut that will be the template for all the rest. I happened to have had the presence of mind to make sure it fit before I cut out all the others.


The main measurement I concern myself with is 4 inches between the top of each notch and the top of the rafter. The height of each rafter is irrelevant as long as it’s more than 4 inches, and the top is a straight, even cut. The bottom of the rafter can run wild which minimizes wasted cuts when millin’ up the lumber. In fact, the lower the depth of the rafter, the more strength it has. Only 4 inches of rafter will rise above the imaginary line between the top edge of the top sill and side-shed sill.


The good thing about rafter makin’ is that I can do it standin’ right here on the ground. I lay the master rafter on top of another board, makin’ sure the tops are even (the bottoms don’t matter as I described just a second ago). Then I can trace the notches out on both ends of the rafter. The next step is probably self-evident … I cut out the notches.


With notches cut out on all rafters, I toe nail the one of the inside rafters into the sill at both ends. Just one big nail on each notch is fine for me. Overdoin’ the nailin’ might weaken the rafter wood.

The four rafters on the edges of the workshop are cut different at the top than the others. This is so they’ll be flush with truss and sills once they’re nailed in, giving the wallboards a nice, even surface to be nailed to.

Once the rafters were in place I stretched a string to mark a straight line for trimmin’ the bottom ends up. Then I cut ’em off even with each other.
The last step for me is to add the lathing to the rafters on the side-shed. Nothing new there; same as with the trusses. I do believe this is startin’ to look more like a workshop … and very soon we’ll be puttin’ on a tin roof.


Posted by Pa Mac, article & photos copyright 2014, Caddo Heritage Productions