
I was halfway through my childhood before gathering the nerve to watch the Wizard of Oz without hiding at some point during the movie. I suppose it was the witch (the one from the west). It would be an understatement to say she intimidated me. The scarecrow was a much more pleasant fellow, but truth be known, he too, was a bit unsettling to me—at least visually. Nevertheless, he was a “good guy” in the movie, and was (to me anyway) the epitome of the “traditional” scarecrow.
Now I’ve seen many scarecrows in my life and some look as though they were made in five minutes maximum—as though little time and thought were put into them. But that’s okay. A shirt draped over a couple of sticks can still keep pesky animals away from your plants (provided you keep a few other things in mind), but if you’re going to the trouble to build a scarecrow, you might as well think big and put a little more effort in it.
The Scare Factor
I have this rule of thumb regarding scarecrows: I figure that if I build ‘em scary enough to make me uncomfortable, they’ll likely perform their job better. There’s something spooky about a 6-foot doll standing lifeless in your garden for days on end. Maybe critters share the same emotions, which could be why they work so well. Here’s a formula I’ve developed for pre-testing the “scare factor” of my own scarecrows (this may not be accurate for everyone, but it can be adjusted one way or the other relative to your own level of uneasiness):
If you’re a little nervous when you look at your scarecrow, you’ll keep crows away for a couple of hours. If you are only able to look at it for short periods of time, and with only one eye open, you might be able to keep most crows off for almost a week. If vehicles passing by your house are swerving off the road or you find it harder to work in your garden alone for any period of time, you have probably created a scarecrow that will get done what you need it to do with a minimum of help from you. I’ll explain later on, but now let’s get to buildin’.
Your content goes here. Edit or remove this text inline or in the module Content settings. You can also style every aspect of this content in the module Design settings and even apply custom CSS to this text in the module Advanced settings.
Materials
• hay, straw, or dry lawn clippings
• two wooden boards: 1 X 2 X 30 and 1 X 2 X 18
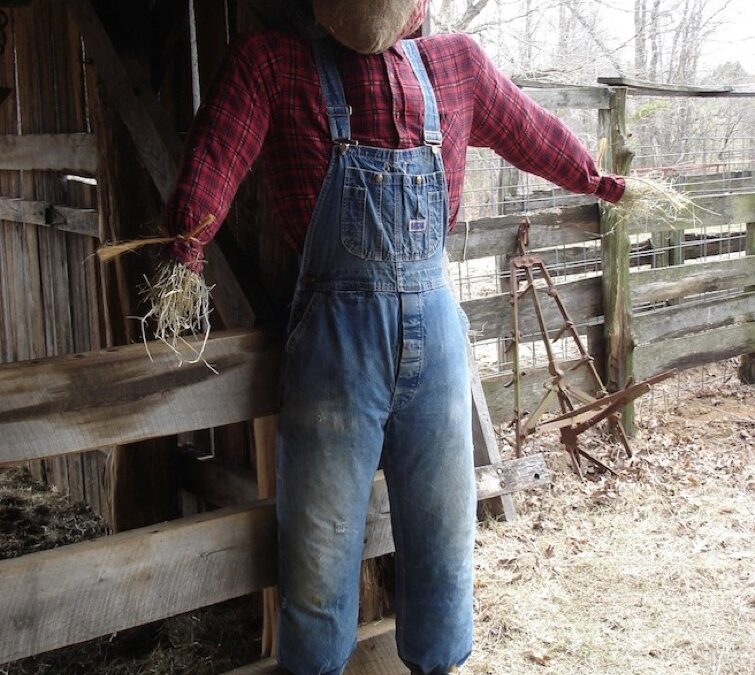
• long sleeve shirt
• overalls
• hay twine
• cloth or burlap sack
• a nice stylish hat
Putting It Together
First, take the 18 inch 1 X 2 board and bevel the ends with a saw so that they slant downward. Then nail the beveled 1 X 2 about 6 inches down from the top of the long board to form a cross. Turn the cross over on and nail in a fencing staple just below the point where the two boards meet. Attach a heavy gauge wire to the staple to form a loop that will be used for hanging the scarecrow.


Now we turn our attention to style.
For convenience sake, you might use children’s or teens’ sizes for scarecrow apparel. The resulting smaller size makes them easier to haul around or store for the winter, plus…I just can’t believe that crows will view a teenage scarecrow any less a threat than we would a teenage werewolf.
With the crosspiece complete, put the shirt on over it using hay twine to tie the cuffs and the shirt tail closed. Button up the shirt and begin stuffing it with hay or straw. Put plenty of hay over the horizontal board to keep the weight from eventually tearing the shirt.


Decent heads for scarecrows may be made from canvas sacks such as those used for smoked hams with their asymmetrical shape. Also, cloth sacks can still be found at old-fashioned grist mills that sell flour or cornmeal. Facial characteristics may be drawn or painted on with weatherproof paint—or just leave the face featureless (which to me is a little unnerving, in and of itself; kind of like a life-size Amish doll). Dipper gourds can make really good heads, and with their long handles turned just right they make pretty ominous proboscis-style noses. Whatever head you choose, place the open end over the 6 inches of vertical board that rises above the crosspiece, and tie around them both tightly with hay twine.
Lastly, tie the bottom pants legs of the overalls with hay twine and fill them with hay. Put the overalls on (the scarecrow, that is) and finish stuffing him until he’s pretty plump. Give him his hat and he’s ready for work.

Timing is Everything
The first use for your scarecrow is to keep crows out of your garden during early spring when the corn is young. This critical time lasts from planting, up until the corn has some height to it. When germinating seed corn first breaks the surface, its tender green spike gives crows a handle with which to pull the remaining kernel out of the ground. So put your scarecrow in position the day you plant. After corn has reached a height of about half a foot, give the scarecrow a rest in your garden shed until later in the season (you don’t want crows to get any more used to him being there than they need to be). Then pull him out for duty again just as silks on the ears begin to wilt and turn brown. It seems as though crows know when your about to pull your first ripe ears and will beat you to it by about half a day.

There are about as many ways for keeping crows out of corn as there are gardeners in the world. I’ve found that most solutions work … for a while. The key to discouraging crows, or even other pests such as deer, lies in making them uncomfortable or nervous through constant change to the garden environment. Crows are nervous birds, but like most animals, they’ll get comfortable with things the more they see them in the same position daily. You’ll do well with a scarecrow, but not if you put him up in spring and don’t touch him again until he’s faded and falling apart in autumn. Timing is everything…don’t put the scarecrow out till you really need it, and then pull it out when you don’t. You don’t want the crows to get use to it. Keep moving him to new positions: making him “hold” rakes or hoes, park a wheelbarrow in front of him—whatever you have to do to make him appear as active as possible. Make him hold a wind chime for the added dimension of sound; use your imagination.

Beyond the growing season, a good scarecrow may be used as harvest time or Thanksgiving decoration in your yard. If space permits, keep it stored out of the weather until it will be used the following year’s growing season.
Totally Optional (But Amusing)
Since you’ve opted out of hanging a shirt on a stick and have gone to the time and trouble to build a traditional scarecrow, you might as well have some fun with him (or her). Here are some hints:
1. Fashion the scarecrow to look as much like you as possible. If people don’t look too closely, they’ll think that you’re a hard worker with as much time as they see you spending in your garden.
2. Construct the scarecrow to look like someone that gets on your nerves; it’ll give you a psychological edge to see them standing motionless and helpless out in the rain.
3. Be the talk of the neighborhood with all the diverse poses you can cause your scarecrow to strike on a regular basis. (You’ll have to be resourceful with the mechanics of all these; I can’t help you with everything.) For instance:
a. Sleeping against a nearby tree or post with hat over face.
b. Hovering over the barbecue grill (unlit)
c. Reading a newspaper while reclined in a lounge chair.
d. Bent over the open hood of car parked nearby.
e. Holding his head in his hands (Halloween only).
f. Sitting on your porch swing at Christmas time with a Santa hat on (He deserves that much. After all, what has the plastic, illuminated Santa Clause ever done for your garden?)
And one more thing: Whenever you are outside and you see crows watching you from a distance, stand silently with your arms spread out for a moment, then yell your head off and wave wildly. It’ll give your scarecrow more credibility, and keep crows wondering who’s real. Every little bit helps.

(This article was written by Pa Mac and first published as “Fear in the Garden” in a 2007 issue of Tennessee Gardener Magazine, excerpted here with permission courtesy of State by State Gardening)